FAQ
FAQ
Popular Questions
This FAQ page is designed to answer your questions and provide insights into the world of tree inventories and software. Whether you’re a municipality, university, homeowners’ association, or a tree and landscape company, explore the key information you need to make informed decisions about leveraging this powerful technology.
To delete a data point you can click the undesired data point and press the ‘More Options’ button at the top of the tree characteristics pane. At the very bottom of the More Options menu, you will see the option to delete that point.
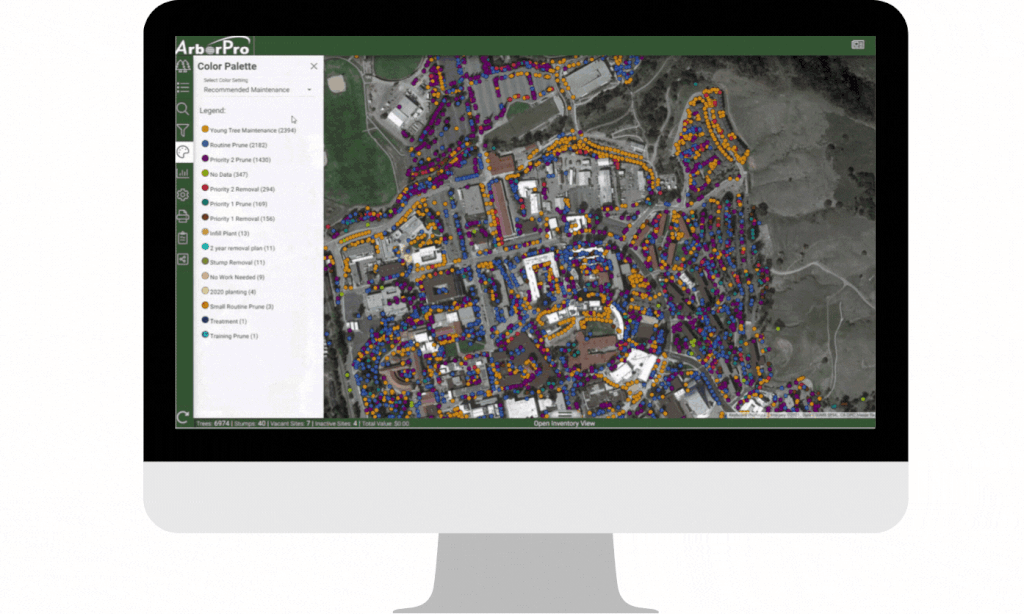
To change the data point colors, you can select the Color Palette tool located on the left hand toolbar. Once the tool is selected you can see the legend to understand the color breakdown and change the default color way from Status, to any of the collected fields. Ex. set the color palette to Common to get a species breakdown.
There are two ways to export csv files. You can either export a csv on a Map Selection (group of highlighted trees), or the entire inventory. The first way is to use the Reporting tool on the left hand toolbar represented by a graph icon. At the bottom of the Reporting tool pane, you can select the ‘Export CSV’ button to download the report. The second way to export a csv is to use the ‘Open Inventory View’ which is centered at the bottom of the screen. From the Open Inventory window, you can select the “Report’ button to download the csv.
To populate labels, select the Preferences tool at the very bottom of the left hand toolbar which is displayed as a gear icon. Click the ‘Map Options’ carrot to expand the options. Scroll down to Map Label Options to toggle the desired labels and edit the font size, color, and threshold (zoom level at which the labels populate at)
At the main ArborPro login screen, you can select the ‘Forgot Password?’ link to have an automated email sent to your email address. This email will let you reset your password. If you experience any further issues, please reach out to our Client Success Manager: [email protected]
There are two ways to share maps. The first way is to zoom the map view to include the desired trees you wish to share. Next you can select the Print Map tool on the left hand toolbar represented by a printer icon. You can then select the ‘Print Preview’ button which will open a new tab where you can expand the four options to customize the map. You can change the colors, labels, dot sizes, and more from the Print Preview options and export a PDF once satisfied with the map. The second way to share maps is using the Community Viewer tool, which is the second tool from the bottom of the left hand toolbar. You can either share the full inventory or select a specific amount of trees and share that map selection. The Community Viewer tool allows you to select which data is viewable and creates a shareable URL link for others to access. The link creates an interactive map where the user can change the data point colors and click on data points to only view data.
If you have not received Admin Tools training from the Client Success Manager, then you can email support with the FIrst name, Last name, and email address for the desired new users. If Admin Tools are enabled for your database, you can click the ‘Client Management’ button at the top right of the screen which is represented by three people and a gear icon if you are set as an Admin on your database. You can then navigate to the ‘User Management’ section and then the ‘User List’ tab. You will see the “Add New User’ button where you can add the new user information. All characters in the emails must be entered as lowercase. Once the submit button is hit, an automated email will be sent to that new user to set their own password. Please reach out to our Client Success Manager to schedule Admin Tools training: [email protected]
If you have not received Admin Tools training from the Client Success Manager, then you can email support with the desired dropdown changes. If Admin Tools are enabled for your database, you can click the ‘Client Management’ button at the top right of the screen which is represented by three people and a gear icon if you are set as an Admin on your database. Within the Client Management section, you can select the ‘Edit Dropdowns’ button to edit the dropdown options.
In order to create a work list, you must start with a map selection. Once you have a group of trees selected, you can navigate to the Work List tool which is located on the left hand toolbar which is represented by 3 stack bullet points and lines. Then select the green plus sign to the right of the word ‘Proposed’ to start adding work list details. You can name the list, set a scheduled date, assign a work crew, and set Work and Sub codes that describe the type of work needed. To finish the list, select the ‘Create’ button to add it to the Open list. You can access the list later and edit the details if needed. When all the work is completed for the list, it can be moved to either the ‘Closed’ or ‘Archived’ lists.
Schedule a Free Consultation with us
If interested, please schedule a time with one of our expert sales specialists to receive a free demo of how our team can fulfill your company’s needs.